- Semana 8
Semana 8
Ejemplos de código
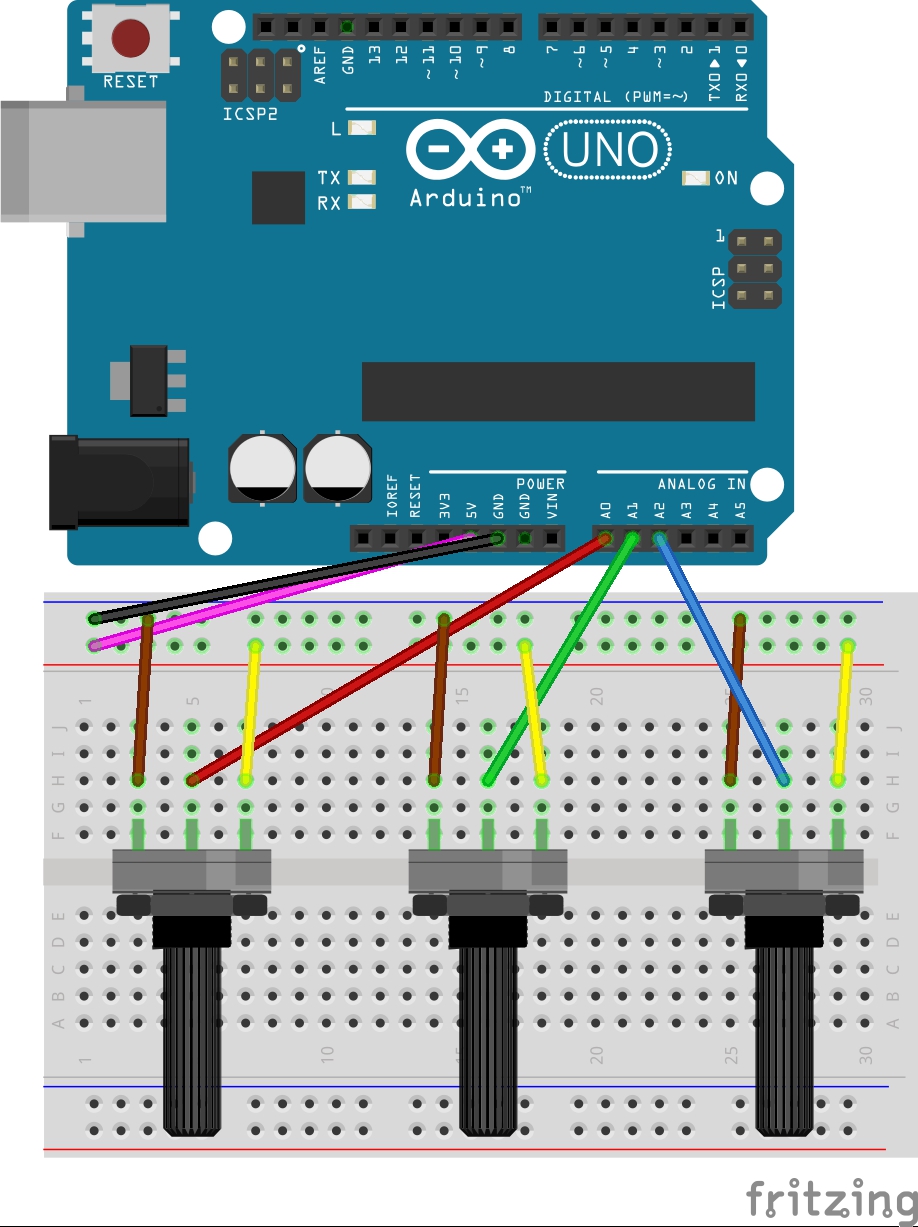
Ejercicio de 3 potenciómetros a color en Processing (COMPLETO)
CODIGO ARDUINO
// Definimos los 3 pins donde conectamos los sensores
int pin1 = A0;
int pin2 = A1;
int pin3 = A2;

void setup() {
  // Iniciamos el serial a 9600 baud rate
  Serial.begin(9600);
  // Definimos que los 3 pin actúan como entrada (INPUT)
  pinMode(pin1, INPUT);
  pinMode(pin2, INPUT);
  pinMode(pin3, INPUT);
  // Esperamos a que processing este listo para recibir datos.
  // Esta funcion esta declarada más abajo como:
  // void hacerContacto(){...}
  hacerContacto();
}

void loop() {
  // Enviamos datos al puerto Serial solo cuando recibimos señal de processing
  if (Serial.available() > 0) {
    // guardamos los datos del primer sensor en val1
    int val1 = analogRead(pin1);
    // esperamos 10 milisegundos antes de hacer la segunda lectura.
    delay(10);
    // Guardamos los datos del segundo sensor en val2
    int val2 = analogRead(pin2);
    delay(10);
    // Guardamos los datos del tercer sensor en val3
    int val3 = analogRead(pin3);

    // Cada uno de los datos guardados, los convertimos a escala 0 - 255
    int r = map(val1, 0, 1023, 0, 255);
    int g = map(val2, 0, 1023, 0, 255);
    int b = map(val3, 0, 1023, 0, 255);

    // Finalmente enviamos los datos en orden por el puerto serial.
    Serial.write(r);
    Serial.write(g);
    Serial.write(b);
  }
}

// Esta funcion entra en loop y espera a que Processing mande una señal
// solo cuando llega esa señal, comienza void loop(){...}
void hacerContacto() {
  while (Serial.available() <= 0) {
    Serial.write('A');
    delay(300);
  }
}
CODIGO PROCESSING
// Importamos la librería de comunicación serial
import processing.serial.*;
// Creamos una variable para user el puerto, en este caso la llamo miPuerto
Serial miPuerto;

// Hacemos un array para guardar los colores que vienen de Arduino
int[] colores = new int[3];
// Creamos un contador que nos ayuda a saber en que color vamos.
// De esta manera, podemos reiniciar el array cuando ya tenemos los 3 colores.
int contadorSerial = 0;
// Vamos a revisar en que momento hacemos contacto con Arduino para iniciar.
boolean primerContacto = false;

// En estas variables vamos a guardar los valores de los sensores para usarlos como colores.
int r = 0;
int g = 0;
int b = 0;

void setup() {
  size(200, 200);

  // Para configurar el puerto, podemos imprimir los puertos en la consola
  printArray(Serial.list());

  // En mi computador, el puerto donde está conectado el Arduino es el segundo.
  // Entonces le digo que el puerto es el segundo en la lista de puertos
  // La lista comienza en 0, asi que el segundo es 1, el tercero 2, etc...
  String nombrePuerto = Serial.list()[1];

  // La librería serial me deja abrir el puerto de la siguiente manera
  // para que processing pueda recibir la información
  miPuerto = new Serial(this, nombrePuerto, 9600);
}

void draw() {
  // Pintar el fondo blanco.
  background(255);
  // asignar los colores según lo datos que llegan de Arduino
  fill(r, g, b);
  // Pintamos el cuadrado
  rect(50, 50, 100, 100);
}

// Lo que esta dentro de esta función podria ir dentro de void draw() {}
// Pero si lo intentan, van a ver que es bastante lento.
// La librería de Serial reconoce esta función que lee los datos mucho más rápido.
void serialEvent(Serial miPuerto) {
  // Guardamos el valor que está entrando por el serial en val
  int val = miPuerto.read();

  // Si no hemos hecho el primer contacto y Arduino envia la señal 'A':
  if (primerContacto == false && val == 'A') {
    // Borramos lo que está en el puerto para que comience por el primer valor (rojo).
    miPuerto.clear();
    // Le decimos a Processing que ya hicimos el primer contacto,
    // asi no vuelve a ejecutar esta parte del código.
    primerContacto = true;
    // Le pedimos datos a Arduino.
    miPuerto.write('A');
  } else {
    // Guardamos el color en el array
    colores[contadorSerial] = val;
    // le sumamos 1 al contador
    contadorSerial++;

    // Solo cuando el array tiene 3 valores (r, g, b):
    if (contadorSerial == 3) {
      // definimos que rojo es el primer valor del array.
      r = colores[0];
      // Verde el segundo
      g = colores[1];
      // Azul el tercero
      b = colores[2];
      // Reiniciamos el contador para que guarde los nuevos valores
      contadorSerial = 0;

      // Pedimos una nueva lectura a Arduino
      miPuerto.write('A');
    }
  }
}
Un tono modulado por potenciómetro
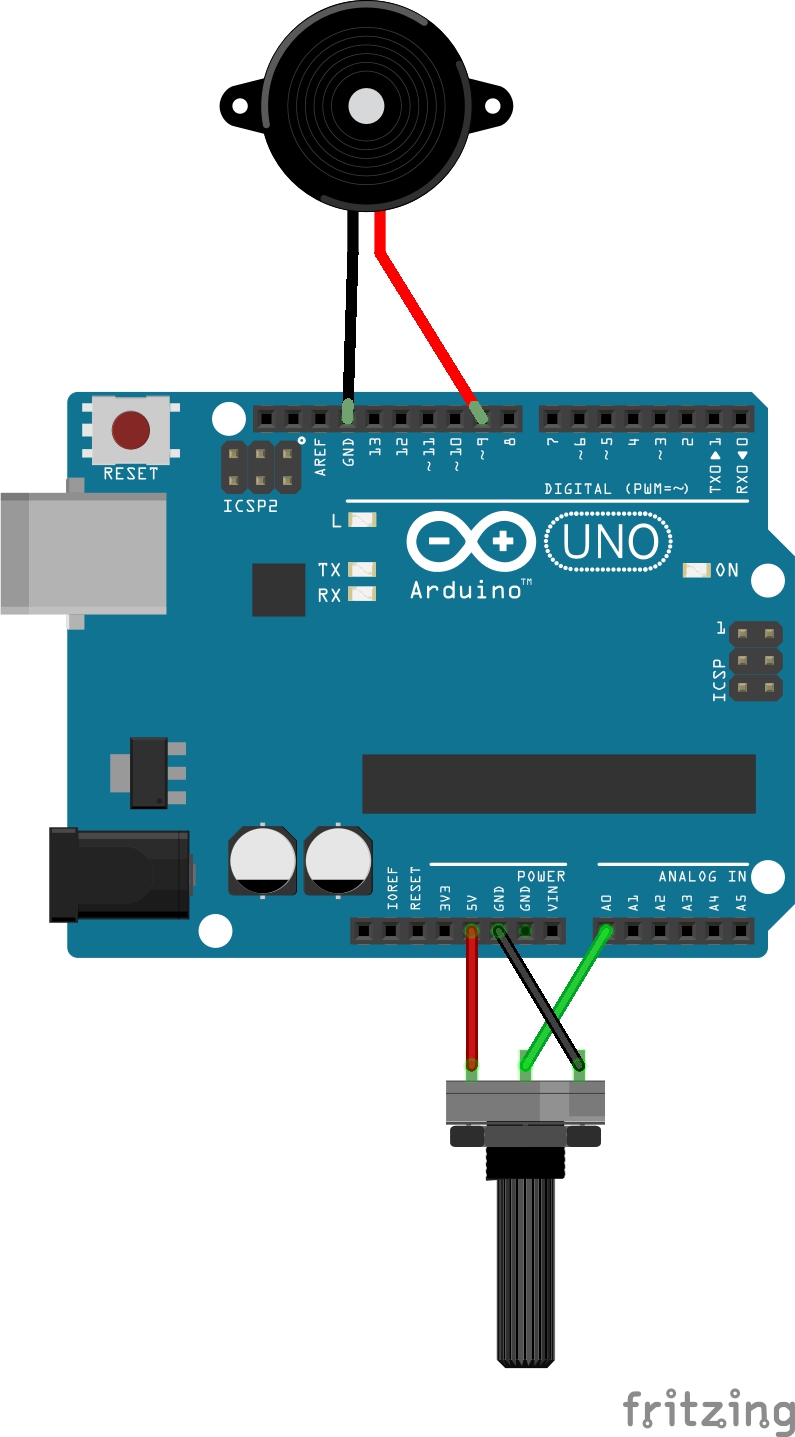
int pot = A0;
int parlante = 9;

void setup() {
  Serial.begin(9600);
  pinMode(pot, INPUT);
  pinMode(parlante, OUTPUT);
}

void loop() {
  int val = analogRead(pot);
  int s = map(val, 0, 1023, 0, 200);
  analogWrite(parlante, s);
}
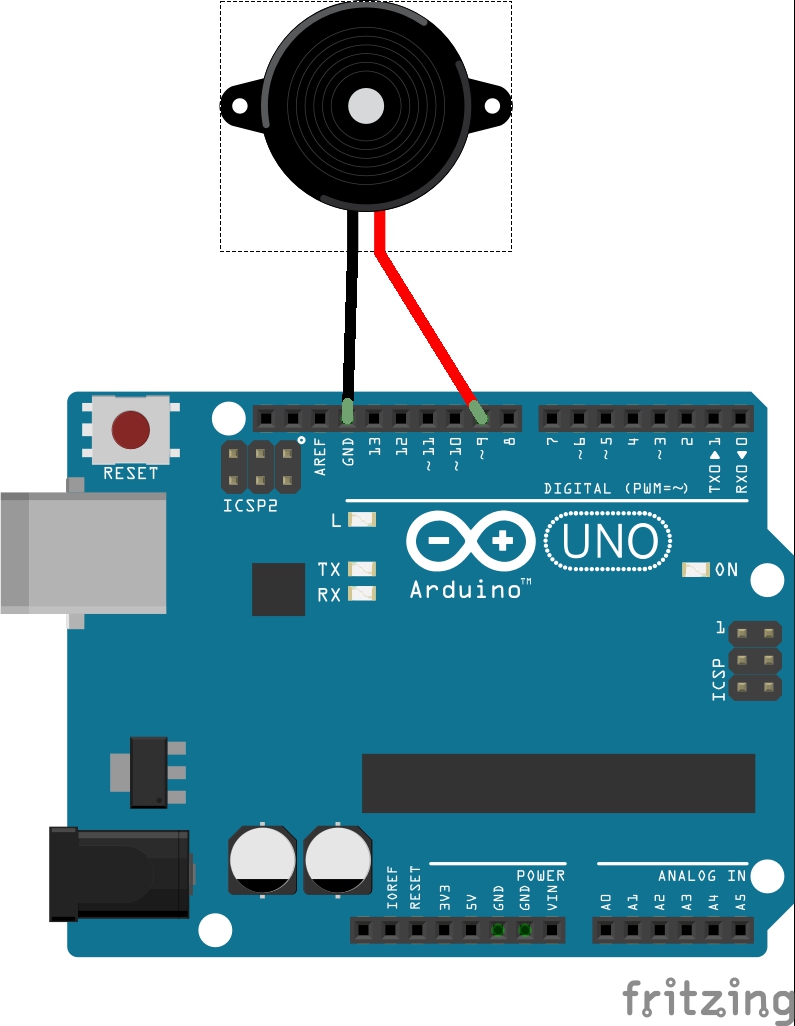
Múltiples tonos desde Arduino
 DESCARGAR ARCHIVO .ZIP con el código de Arduino
Pestaña principal
// Los tonos
#include "pitches.h"

// Melodias
#include "fin.h"
#include "melodia2.h"
#include "mario.h"

int parlante = 9;

void reproducirMelodia(int melodia[], int numeroNotas) {
  for (int thisNote = 0; thisNote < numeroNotas; thisNote += 2) {
    // Para calcular la duración:
    // divisimos 1 segundo (1000) por el tipo de nota.
    //Ejemplo: una cuarta = 1000 / 4, octava = 1000/8, etc.
    int duracion = 1000 / melodia[thisNote + 1];
    tone(parlante, melodia[thisNote], duracion);

    // Para distinguir cada nota, hacemos una pequeña paura entre cada una
    int pausaEntreNotas = duracion * 1.30;
    delay(pausaEntreNotas);
    // paramos la nota
    noTone(8);
  }
}

void setup() {
  reproducirMelodia(fin, finNum);
  reproducirMelodia(melodia2, melodia2Num);
  reproducirMelodia(marioPrincipal, mario1Num);
  reproducirMelodia(marioSub, mario2Num);
}

void loop() {
  // No hacemos nada en loop asi que esto queda vacio.
}
Pestaña 2 tonos, pitch.h
/*************************************************
 * Public Constants
 *************************************************/

#define NOTE_B0  31
#define NOTE_C1  33
#define NOTE_CS1 35
#define NOTE_D1  37
#define NOTE_DS1 39
#define NOTE_E1  41
#define NOTE_F1  44
#define NOTE_FS1 46
#define NOTE_G1  49
#define NOTE_GS1 52
#define NOTE_A1  55
#define NOTE_AS1 58
#define NOTE_B1  62
#define NOTE_C2  65
#define NOTE_CS2 69
#define NOTE_D2  73
#define NOTE_DS2 78
#define NOTE_E2  82
#define NOTE_F2  87
#define NOTE_FS2 93
#define NOTE_G2  98
#define NOTE_GS2 104
#define NOTE_A2  110
#define NOTE_AS2 117
#define NOTE_B2  123
#define NOTE_C3  131
#define NOTE_CS3 139
#define NOTE_D3  147
#define NOTE_DS3 156
#define NOTE_E3  165
#define NOTE_F3  175
#define NOTE_FS3 185
#define NOTE_G3  196
#define NOTE_GS3 208
#define NOTE_A3  220
#define NOTE_AS3 233
#define NOTE_B3  247
#define NOTE_C4  262
#define NOTE_CS4 277
#define NOTE_D4  294
#define NOTE_DS4 311
#define NOTE_E4  330
#define NOTE_F4  349
#define NOTE_FS4 370
#define NOTE_G4  392
#define NOTE_GS4 415
#define NOTE_A4  440
#define NOTE_AS4 466
#define NOTE_B4  494
#define NOTE_C5  523
#define NOTE_CS5 554
#define NOTE_D5  587
#define NOTE_DS5 622
#define NOTE_E5  659
#define NOTE_F5  698
#define NOTE_FS5 740
#define NOTE_G5  784
#define NOTE_GS5 831
#define NOTE_A5  880
#define NOTE_AS5 932
#define NOTE_B5  988
#define NOTE_C6  1047
#define NOTE_CS6 1109
#define NOTE_D6  1175
#define NOTE_DS6 1245
#define NOTE_E6  1319
#define NOTE_F6  1397
#define NOTE_FS6 1480
#define NOTE_G6  1568
#define NOTE_GS6 1661
#define NOTE_A6  1760
#define NOTE_AS6 1865
#define NOTE_B6  1976
#define NOTE_C7  2093
#define NOTE_CS7 2217
#define NOTE_D7  2349
#define NOTE_DS7 2489
#define NOTE_E7  2637
#define NOTE_F7  2794
#define NOTE_FS7 2960
#define NOTE_G7  3136
#define NOTE_GS7 3322
#define NOTE_A7  3520
#define NOTE_AS7 3729
#define NOTE_B7  3951
#define NOTE_C8  4186
#define NOTE_CS8 4435
#define NOTE_D8  4699
#define NOTE_DS8 4978
Pestaña 3 melodia 1, fin.h
const int fin[] = {
  NOTE_C4,  4,
  NOTE_G3,  8,
  NOTE_G3,  8,
  NOTE_A3,  4,
  NOTE_G3,  4,
  0,        4,
  NOTE_B3,  4,
  NOTE_C4,  4
};
int finNum = sizeof(fin) / sizeof(int);
Pestaña 4 melodia 2, melodia2.h
const int melodia2[] = {
  NOTE_D4, 8,
  0, 8,
  NOTE_F4, 6,
  NOTE_D4, 16,
  0, 16,
  NOTE_D4, 16,
  NOTE_G4, 8,
  NOTE_D4, 8,
  NOTE_C4, 8,
  NOTE_D4, 8,
  0, 8,
  NOTE_A4, 6,
  NOTE_D4, 16,
  0, 16,
  NOTE_D4, 8,
  NOTE_AS4, 8,
  NOTE_A4, 8,
  NOTE_F4, 8,
  NOTE_D4, 8,
  NOTE_A4, 8,
  NOTE_D5, 8,
  NOTE_D4, 16,
  NOTE_C4, 16,
  0, 16,
  NOTE_C4, 16,
  NOTE_A3, 8,
  NOTE_E4, 8,
  NOTE_D4, 2,
  0, 2
};
int melodia2Num = sizeof(melodia2) / sizeof(int);
Pestaña 5 melodia 3, mario.h
const int marioPrincipal[] = {
  NOTE_E7, 12, NOTE_E7, 12, 0, 12, NOTE_E7, 12,

  0, 12, NOTE_C7, 12, NOTE_E7, 12, 0, 12,
  NOTE_G7, 12, 0, 12, 0, 12, 0, 12,
  NOTE_G6, 12, 0, 12, 0, 12, 0, 12,

  NOTE_C7, 12, 0, 12, 0, 12, NOTE_G6, 12,
  0, 12, 0, 12, NOTE_E6, 12, 0, 12,
  0, 12, NOTE_A6, 12, 0, 12, NOTE_B6, 12,
  0, 12, NOTE_AS6, 12, NOTE_A6, 12, 0, 12,

  NOTE_G6, 9, NOTE_E7, 9, NOTE_G7, 9,
  NOTE_A7, 12, 0, 12, NOTE_F7, 12, NOTE_G7, 12,
  0, 12, NOTE_E7, 12, 0, 12, NOTE_C7, 12,
  NOTE_D7, 12, NOTE_B6, 12, 0, 12, 0, 12,

  NOTE_C7, 12, 0, 12, 0, 12, NOTE_G6, 12,
  0, 12, 0, 12, NOTE_E6, 12, 0, 12,
  0, 12, NOTE_A6, 12, 0, 12, NOTE_B6, 12,
  0, 12, NOTE_AS6, 12, NOTE_A6, 12, 0, 12,

  NOTE_G6, 9, NOTE_E7, 9, NOTE_G7, 9,
  NOTE_A7, 12, 0, 12, NOTE_F7, 12, NOTE_G7, 12,
  0, 12, NOTE_E7, 12, 0, 12, NOTE_C7, 12,
  NOTE_D7, 12, NOTE_B6, 12, 0, 12, 0, 12
};
int mario1Num = sizeof(marioPrincipal) / sizeof(int);

const int marioSub[] {
  NOTE_C4, 12, NOTE_C5, 12, NOTE_A3, 12, NOTE_A4, 12,
  NOTE_AS3, 12, NOTE_AS4, 12, 0, 6,
  0, 3,
  NOTE_C4, 12, NOTE_C5, 12, NOTE_A3, 12, NOTE_A4, 12,
  NOTE_AS3, 12, NOTE_AS4, 12, 0, 6,
  0, 3,
  NOTE_F3, NOTE_F4, NOTE_D3, NOTE_D4,
  NOTE_DS3, NOTE_DS4, 0,
  0,
  NOTE_F3, 12, NOTE_F4, 12, NOTE_D3, 12, NOTE_D4, 12,
  NOTE_DS3, 12, NOTE_DS4, 12, 0, 6,
  0, 6, NOTE_DS4, 18, NOTE_CS4, 18, NOTE_D4, 18,
  NOTE_CS4, 6, NOTE_DS4, 6,
  NOTE_DS4, 6, NOTE_GS3, 6,
  NOTE_G3, 6, NOTE_CS4, 6,
  NOTE_C4, 18, NOTE_FS4, 18, NOTE_F4, 18, NOTE_E3, 18, NOTE_AS4, 18, NOTE_A4, 18,
  NOTE_GS4, 10, NOTE_DS4, 10, NOTE_B3, 10,
  NOTE_AS3, 10, NOTE_A3, 10, NOTE_GS3, 10,
  0, 3, 0, 3, 0, 3
};
int mario2Num = sizeof(marioSub) / sizeof(int);
Sonido Arduino y Processing
En processing podemos descargar la librería "Sound": Sketch -> Import Library -> Add Library Alli buscamos "Sound" e instalamos - Sound x.x.x The Processing Foundation Sound library based on MethCla for Processing.
Usando como ejemplo la comunicación serial de la clase anterior, podemos adaptar los ejemplos de esta librería para que reaccionen a los datos que envia Arduino por el puerto serial. De esta manera tenemos la opción de usar archivos de audio y los parlantes del computador.